As you may have noticed recently I've been up to my eyes in mini quilt-making to decorate my sewing room wall. I've been hanging them up with strong parcel tape which has been working well for my really 'mini' one's, as they're so small and I can move them around without worrying about holes in the wall. However, for my larger Swoon mini quilt I needed a more permanent fixture to hang snugly in our living room alcove. So today I thought I would show you how I made a hanging sleeve to give a nice professional finish. Let's get started.
1. Measure the width of your quilt. Cut a piece of fabric that measures the exact width of the quilt x 7". I like to use the same fabric as used for the backing to blend seamlessly.
2. With the shorter ends of the fabric, press 1/2" and then again by 1/2" enclosing the raw edges. Sew.
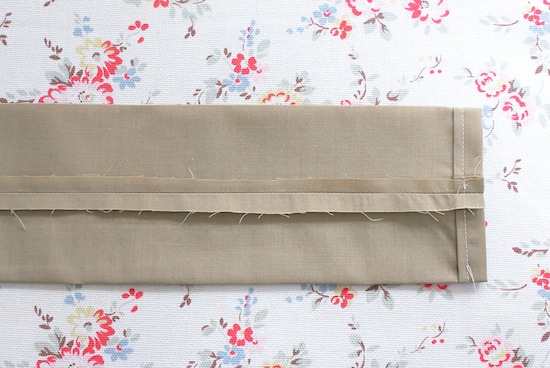
3. Fold in half lengthwise, and sew with a 1/2" seam.
 4. Centre the hanging sleeve, and press the seam (you have just sewn) flat. Press well here.
5. Re-gig the hanging sleeve slightly by sliding it downwards by about 1/4" or so. Press well. This allows for some extra slack when the dowel holds the quilt up - without this the dowel may bulge out slightly.
6. Position the hanging sleeve on the quilt by about an 1" from the top. Keeping in mind in needs to be low enough in that the sleeve is not shown when hung from the wall.
7. Pin in place, and hand sew around all sides. Be careful to only sew through the backing and batting, not the front of the quilt.
8. Cut a length of dowel just shy of the quilt length. Slide through the sleeve. Hang two picture hooks on both ends of the dowel and position where you want the quilt to hang on the wall - mark two pencil lines where the picture hooks are and hammer them in.
Hang your lovely mini quilt on the wall, and admire your work!
Pssst. Don't forget to enter my giveaway to win Lori Holt's latest book; Great Granny Squared. Competition closes tomorrow, enter to win here.


I've been using the 3M Command Clear Fridge Clips to hang my mini quilts. Two clips hold very securely, no sleeve needed and no holes in the walls :). They will also hold larger quilts with a few more clips. They're clear so you don't even notice them.
ReplyDeleteI've used command strips previously and when I removed them they pulled not only the paint of my wall but the plaster too! So I'm avoiding those at all costs now ... Hope yours work out better than mine did :)
DeleteOh dear~! That's not good. I use them all the time for Christmas décor and other things - have not had any trouble removing them. Did you have the sort that pull down and stretch?
DeleteA beautiful mini quilt!! xo Heather
ReplyDeleteThanks for that Jess, I need to do a couple of these. Love your swoon mini
ReplyDeleteI hang my big quilts this way too!
ReplyDeleteHello, thank you for the tutorial. Between step 4 and step 5 do you turn through the tube? And then you put the centre seam flush against the backing, I believe. Is that correct? Thank you.
ReplyDelete