Showing posts with label english paper piecing. Show all posts

Tuesday, 25 May 2021

Fiesta Gitana Quilt - English Paper Piecing Tips!

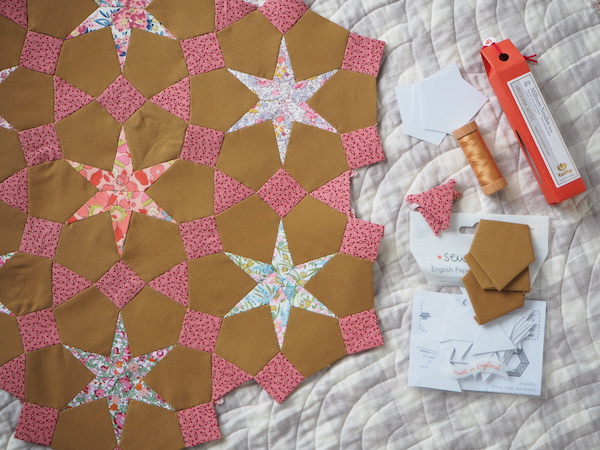
Fiesta Gitana is the cover quilt from the Millefiori Quilts book 4 by Willyne Hammerstein. Certainly not for the faint hearted, this is a pattern for those English Paper Piecer's who have a lot of practice under their belt and love a challenge! At Sew & Quilt, we have created English Paper Pieces to make the quilt, along with matching acrylic templates with a 3/8" added seam allowance to cut out your fabrics and fussy-cut to your hearts desire!

Truth time, I found it tough to begin, unpicking many seams when they weren't lining up and looked miles out!? Then checking that the templates were the right size, checking my basting was tight, not tight enough? As I was sewing more of the shapes together, I realised the slightest millimetre can throw off the next shape and then you can look a mile off where needed, then joining to the sharply pointed kites made it even more noticeable. After some practice and testing out the joining sequence in a couple of different ways, I landed on a way that resulted in neater joins. So I thought it was a must to share with you all incase you fancied having a go too. Please see below the link to click on and download the block assembly guide.

English Paper Piecing Tips

The most important tip is to manipulate your templates to where they need to be. Do this by pulling your fabric basted pieces in the exact position it needs to finish when sewing a new shape onto a previous one. Also make sure to start sewing at the correct starting point, flip the shapes so you look at them from the front side and see how they look, be careful to keep this position and use a Clover Wonder Clip to keep them secure if needed. 

If you've sewn a shape from the starting point slightly off where it should have been sometimes you will have to unpick and start that seam line again as it could throw off the next piece etc. Now you understand why I said this was a challenge! :-D

Download the block assembly for English Paper Piecing the Fiesta Gitana Quilt Pattern here. Do let me know if it proves useful for you, the same tips can be applied for other tricky EPP quilts too. Happy sewing! Links for products below.

Please note you will need a copy of the Millefiori Quilts book 4 to make the quilt, my block construction is simply to help with EPP methods only, full copyright belongs to Quiltmania the book publisher.


Please find a link to the supplies below;

Fiesta Gitana English Paper Pieces

Fiesta Gitana Acrylic Templates

Fabrics used; Selection of Liberty Fabrics for the stars, Art Gallery Fabrics Pure Elements Golden Bronze for background. 

Saturday, 14 November 2020

The FREE Jane Austen Quilt Pattern

The beautiful Jane Austen quilt! A remarkable patchwork quilt that is thought to be made by Jane Austen herself, alongside her sister Cassandra and their mother. It was created in the traditional technique of English Paper Piecing, whereby fabrics are tacked or basted to a paper template and then whipstitched together. 
Myself and Robin have drawn up a meticulous reworked version of the original patchwork coverlet FREE for you to recreate this spectacular quilt as well. 


It features a medallion style diamond centre panel with a broderie perse appliqued design of birds and a basket of flowers. Broderie perse is the technique of selecting and cutting motifs from chintz and other such fabrics and needle-turn appliquéing them to different background fabrics to create a new design. We have omitted a specific appliqué design for the medallion centre, so you can create your own. The main section of the quilt top is then made up of diamonds pieced between a cream and navy dot sashing, finished with a deep border of smaller sized paper pieced diamonds. 

We have been asked to make paper pieces for the Jane Austen quilt for many years, and for one reason or another it always ended up on the back-burner. Though when I heard news of a Jane Austen At Home fabric collection to launch I knew it we had to make time! To one of our loyal Festival of Quilts shoppers each year (whose name escapes me now!) that always asked, can we do the Jane Austen papers - this is for you! ;-) 

We are offering a free downloadable 5-A4 page PDF pattern through Sew & Quilt. We also have printed copies if you don't have access to a printer, and prefer a hard copy rather than online viewing. Wow, it was quite the brain exercise to create and draw up the pattern, so much so that I'm not sure we would have done it had I known that from the start, lol! Download your Jane Austen Quilt Pattern here.

Quilt Size: 71” x 89”


What do I need to make the quilt?

You will need the Jane Austen English Paper Piece Kit to complete the quilt top. 

We have created two options for you;

- Starter size kit, which is just one regular size pack of each (+1 extra of one, in order to cut down, details included in the pack and on the product listing) of our standard sized bag options we sell at Sew & Quilt, put together as one item for you to purchase. 

- Complete kit, which includes all the paper pieces required to make the quilt top (though it doesn't include all of the small diamonds for the border, as we thought you could reuse some of those, given the large amount). 

We have all the information inside the pattern on total numbers of pieces, and the EPP kit product page gives details on pack sizes (if you wanted to work out how far the starter kit will get you). 

We also have matching acrylic templates, these include a 3/8" seam allowance. 

What fabric do I need to make the quilt?

We have provided yardages requirements in the quilt pattern, based on cutting rectangles, as noted this will be the most wasteful in terms of fabric usage. However this is the only way we are able to give you an accurate yardage requirement. 

You will need 22 fat quarters for the main quilt top. 

5-1/2 yards ~ 5.25m approx. (large diamonds). For our version, we have used 18 FQ's from the Jane Austen At Home Collection + an additional 4 which are duplicated.

I hadn't even thought to mention in the quilt pattern which ones they were (silly me!), but it's important you should know this information which is not included in the pattern:

The four duplicated FQ's for our design are; Elinor 04, Harriet 09, Margaret 11 and Penelope 15. 

4-1/2 yards ~ 4.25m, approx. (Cream with Navy Dot, for sashing fabric)

9 yards ~ 8.25m approx. (borders, I would advise using up your fabric stash as the pieces are very small so you don't necessarily need the same collection, just stick with on-theme prints. 

3/4 yard ~ 0.75m (binding fabric)


The photo above shows you can cut (24) 3" 5-point diamonds to a (UK sized) fat quarter. Our pattern says you can cut (12) to a FQ, because as mentioned above we have based this on rectangles. Instead cutting this way (using the Jane Austen acrylic template set) you can be more frugal with your fabric. 


The Jane Austen fabrics are sold out? 

If our Jane Austen FQ bundle and the 4 additional FQ's mentioned above are out of stock, don't worry. I would instead suggest you use our numbered key of 0-17 and gather other fabrics and label each print 0-17. That way you can still follow along with our numbered diagram. Remember you will need two FQs of numbers 04, 09, 11, 15, when using our cutting instructions from the quilt pattern. 

Find all our Jane Austen Quilt products online at Sew & Quilt

I really hope you have fun making this quilt, it is a beautiful design that has stood the test of time and will no doubt become a family heirloom - which is what we are all about at Sew & Quilt; 'Creating your future heirloom today!'.


Please share your versions of the Sew & Quilt Jane Austen quilt pattern, using the hashtag #JaneAustenEPPQuilt so we can share progress and updates online!

Friday, 28 February 2020

Churn Dash Quilt Block Pattern


Hello readers! The Churn Dash quilt block is such a simple but effective block. Always a classic. I have two construction methods to share with you today, regular machine-pieced or using English Paper Pieces, to keep all both camps happy ;-)

My inspiration came from some antique Churn Dash blocks I'd found on Etsy, they have a subtle pink gingham background with handsome 1800s reproduction prints. I'm just gathering ideas at the moment to give my sewing room a little spruce up so I thought some antique quilt blocks framed on the wall would be ideal decor. Then I realised ... wait I'm a quilter, I should probably make these myself?! And they sold, so I really had no choice.


The new Full Circle quilting fabric we have in stock at Sew & Quilt was just the ticket, couple that with the Pink Carolina Gingham I was in business! 

These blocks finish at 6-3/4" square (6-1/4" when into your quilt) so they would work well in a mini quilt, or adding as a border to a medallion quilt perhaps, or a whole quilt of these!

For the machine-pieced method, please follow the below steps;

Cutting
For each Churn Dash block you will need to cut the following;

From background fabric (Pink)
(2) 4" squares
(5) 1-3/4" squares

From coloured fabric (Green)
(2) 4" squares
(4) 1-3/4" squares


Block Assembly
1. Place a 4" pink and green square right sides together. 
2. Draw a line from corner to corner along the diagonal.


3. Sew a 1/4" straight line from either side of the marked line. 
4. Rotary cut along the marked line. 


5. Press seams open. You will now have 4 HST units. 
6. Trim to 3" square.


7. Sew a 1-3/4" pink and green square together. Make 4 units total.
8. Press seams open. 


9. Your units are ready to sew together!


10. Follow the placement below for sewing each of the three rows. 
11. Sew the three rows together to complete the block. Press seams open. 


For the English Paper Pieced method, please follow the below steps;


English Paper Pieces
2-1/2" Half Square Triangle paper pieces | matching acrylic template
1-1/4" Square paper pieces | matching acrylic template

Cutting
For each Churn Dash block you will need to cut the following (approximate sizing, which allows for acrylic cutting templates with 3/8" seam allowance);

From background fabric (Pink)
(2) 4" squares. Subcut diagonally to make (4) triangles.
(5) 2" squares

From coloured fabric (Dark Pink)
(2) 4" squares
(4) 2" squares

As a guide, from a UK sized fat quarter you can make approximately 7 blocks per fat quarter for the main coloured fabric (shown here as dark pink). With a US size fat quarter you can make 6 if you're accurate.

Block Assembly
1. Once you have cut your fabrics, baste your fabrics to the paper templates. I like to use the Sewline Glue Pen, but use your preferred method either glue or tacking. I have a detailed EPP basting tutorial if you needed more information.


2. Following the diagram below, assemble your block by sewing each row together using a whipstitch. I have a detailed tutorial on sewing EPP shapes together for further help on this topic.


3. Sew the three rows together to complete the block, easy peasy!


Fabrics used: Full Circle by Marcus Brothers and Pink Carolina Gingham by Robert Kaufman. Get all the quilting supplies on our site.

Thanks for sewing along with me! It's good to be back over here. Tag me on instagram @messyjesse1 or @sewandquilt so I can see your Churn Dash blocks.

Wednesday, 15 January 2020

Using Acrylic Cutting Templates for Fussy-Cutting


'Fussy-cutting' it's a funny term, but quite simply; it is cutting and using a particular motif or repeating element of a fabric print intentionally. When used with the precision of English Paper Piecing, it's a perfect fit and you can understand why it's so incredibly popular - and addictive!

Using acrylic cutting templates for English Paper Piecing in general is a life-saver and produces accurately cut fabric pieces ready to baste to your paper templates. People are often confused by them and think they use them in place of paper templates, but they are designed to be used alongside paper templates as they have the seam allowance added around the edge.

All of our Sew & Quilt acrylic templates come with a 3/8" seam allowance. Why you ask? 1/4" is the minimum you need for turning over, 3/8" is 1/8" larger so it gives you a little more wiggle-room - which you will come to love!
*I should note, our teeny acrylics - under 1/2" have a regular 1/4" seam allowance - well, they are tiny after all!

Quilting Supplies:
* Quilting cotton, which features a repeating pattern or motif
* Sew & Quilt acrylic cutting template
* Pen or water soluble pen
* Medium sized scissors or 28mm rotary cutter
* Paper Pieces (of matching size)
* Sewline Glue Pen


1. First gather your fabric and find your perfect motif! A pretty drawing such as this, stripes, repeating patterns that you can spin and and tilt all work wonderfully for creating a kaleidascope, fussy-cut effect.


2. Use a pen or pencil to draw around the acrylic template. More often than not I will use a regular Biro (call the quilt police!) as I find it easiest to see and I'm cutting on the drawn line so I don't need to worry about spoiling the fabric. You can also use a water-soluble pen, which I use sometimes too. 


3. Cut out your shape. I personally find scissors give me more accuracy, but you can also use a small rotary cutter too if that feels more comfortable.


4. Dab a dot of fabric glue on the middle of the paper template, position the fabric shape on top centrally (the glue will hold it's place to stop it moving). Baste the fabric to the paper template, using your preferred method. 


5. Voila! Finished. Now see if you can stop yourself next time you look at a fabric in your stash, soon it will be swiss-cheese!
Fabric used: Liberty Sussex B Tana Lawn


If you're not fussy-cutting but still want to use an acrylic template, a speedy tip would be to rotary cut strips from your fabric, subcut them into the smaller squares or rectangles and then use the acrylic templates to trim off the edges to follow your shape.

At Sew & Quilt we offer them in set sizes that match your paper templates - no need to add the seam allowances, we do that for you to make it easy! So if you're working with 1-1/4" Honeycomb paper pieces, you will need a 1-1/4" Honeycomb acrylic template. Easy, peasy. 

Thursday, 24 September 2015

Tutorial // Apple Cores & English Paper Piecing: Part 2 / Sewing

I'm back with part 2 of my guide for working with apple core shapes using the English paper piecing method. So today we're going to be joining our shapes together. It can look a little bit intimidating due to the curved nature of the shape, but it's really quite simple once you have a little practise. 

Gather your supplies; including your basted apple core shapes, needle, thread and scissors. I've recently switched to using Bottomline threads by Superior for EPP, and I can't recommend it enough. Take a length of thread (no longer than your arm span, to avoid getting tangled up), thread your needle and knot the end. 

This is where you join your shapes together. 

So place your two apple core pieces right sides together. Can you see where I've flipped these shapes? I'm going to sew right along those two opposing curved sides are, all we have to do is just adjust how we hold the pieces as we sew. 
Start with needle in one side and slide it through the opposite piece. 

Take the needle back through your starting place and repeat. I like to do this at least 2/3 times to start off and make things nice and secure. Bleugghh please ignore my non-manicured, 'crafty-workers' hands folks ;-) these were some up-close shots! 

Now with your pieces still held in the same position, begin whipstitching your shapes as you would do your regular straight-edge shapes (previous tutorial here). 

TIP: I do a lot more stitches per inch with curved shapes to ensure there are absolutely no gaps in my work and ensure correct alignment. 

Once you reach the point above; where the curves are separating in different directions. Stop. 

Re-position your shapes so they are lying at wide angle apart, almost lying flat - but not. 

TIP: My technique for a neat non-visable stitch is to place your (non-needle holding) middle finger underneath the section where you are sewing, use this as a balance to hold your pieces correctly. I've actually moved my thumb out of the way in the above photo so you can get a clear view of my stitch and my middle finger underneath holding the position - but I do like to have my thumb exactly where the needle pokes out on the opposite side. I do this to guide my stitches and be sure I'm 'eating' into the fabric evenly with each whipstitch. 

I find apple cores to be a very forgiving shape for not being visible from the front. Due to the shapes lying quite flat as opposed to  the normal way of placing two shapes right sides together and whipstitching tightly, here you are almost skimming the fabric so you aren't 'eating' into the fabric very deeply, which is generally the problem when stitches are visible from the front. 

Whipstitch all the way along the side, re-positioning as you need. Be sure to pull the thread firmly as you go to keep a tight seam.

Once you reach the end, take 2/3 anchor stitches (just as you did at the start). You'll want to go through the two folds here to make everything secure. This is why we paid extra attention to basting the corners of the apple cores; so we have nice crisp folds so the shapes are the same size and it matches up accurately. Knot your work to finish the seam. 

Your first pieces are joined! As a general rule, I sew apple cores in rows adding in one shape at a time. Once you have your row complete you will want to add more rows one by one. 

I like to remove the papers once I have all sides joined so I can move my work more freely. I lie my work on a flat surface and work the seams with a whipstitch just as I did when joining the individual apple core shapes together.


Once you come to an 'intersection', where four shapes meet together. Catch your needle through the first folds of the lower shapes, repeat 2/3 times. Then repeat for the other two folds of the upper apple core shapes. This will make everything really secure and very neat from the front.


Once you pass the 'intersection', pull the fabric tails or folds out of the way to keep everything neat as you continue whipstitching. 

This is how your work will look from the front. 


I hope my guide has helped you on your future apple core adventures! 

Helpful things to recap and remember:
* When basting your shapes, ensure you have nice tight, folded corners.
* Don't snip into the curved edge too deep, otherwise your fabric will weaken and tear.
* Use a neutral matching thread, if in doubt choose grey
* Remove paper templates once all sides are joined to allow more movement.
* Use anchor stitches at the start and end of each shape and 'intersections'

I'm using the 3" apple core templates for this tutorial. You can find them in my shop here.

If you have any questions, just jot them below and I'll reply in the comments so we can all share. Likewise, if anyone has any tips, do share! I love testing new ideas. Jessie