Showing posts with label craft room. Show all posts

Wednesday, 24 June 2020

Easy Fabric Box Sewing Pattern - Free Tutorial!

I've been after some storage boxes for my Ikea Billy bookcase in my sewing room since the day we put it together, but after much searching I had no luck in finding the right size or style (and spoiler alert, I'm incredibly fussy...). I also wanted to use up some spare fabric I had from a recently reupholstered chair - ok, ok, I bought extra so everything would match... 

So I decided to make some fabric boxes, after a quick google I came across a bunch of tutorials and patterns to make different variations but they either used supplies I didn't have access to, or I couldn't make head nor tail of the instructions, or more importantly I then couldn't work out how to re-work the pattern to re-size them for the size I needed.


So, if you're looking for a really easy-peasy fabric box for storage, which keeps its shape, really sturdy and a simple way of making with minimal pieces to cut you've come to the right place! I've tried to make this particular box as simple as possible, so while there will be better patterns out there which will give you a super neat interior, here you have simplicity. You do have the option of adding bound edges to the interior but I have omitted that in several of my versions for speed (I mean, who has time for that really? Plus it's not noticeable once they're stuffed to the brim, which is a likely ending to this particular shove-it-all-in-until-it's-tidy project).


Example box shown measures approx; 13-1/2" wide x 9-1/2" deep x 8" tall.
To make one box to the dimensions above;

Supplies
1m Exterior fabric (Liberty Emilia's Blooms B Augusta Linen)
1m Interior fabric (Essex Linen, Natural)
1 yard Bosal Craf-Tex Plus, or other heavyweight double-sided fusible stabiliser
Clover Jumbo Wonder Clips
Gutermann Textile Fabric Glue
Optional: 1m Iron-on Interfacing, Firm

Cutting
From exterior fabric;
Cut (1) Piece A = 25" x 14"
Cut (2) Piece B = 10-1/2" x 8"

From interior fabric;
Cut (1) Piece A = 25" x 14"
Cut (2) Piece B = 10-1/2" x 8"

From heavyweight fusible Stabiliser;
Cut (2) Piece A = 9" x 13"
Cut (2) Piece B = 9-1/2" x 7"

Assembly
Use a 1/2" seam allowance.
If your fabrics are particularly lightweight you may want to use some medium or firm-weight fusible interfacing to strengthen up your fabrics, before you begin (my example shown used interfacing on exterior pieces).


Step 1.
Fuse stabiliser between an exterior and interior side piece B. Repeat for both side piece B's. Set to one side.


Step 2.
Place exterior fabric piece A right sides down, place both stabiliser A pieces on top, 1/2" (approx) from the edges. Place the interior fabric piece A on top. Press well to fuse everything together.
Excuse my patched-together interfacing shown here, I didn't have one piece large enough!


Step 3. 
Fold piece A in half along (along the longer side) mark the centre point.


Step 4.
Measure to find the centre point of your side piece B's, mark the point. Place the two marked points together (right sides together). Sew the side piece B to the main piece A.


Step 5. 
Repeat the step above and sew the other side piece B to the main piece A. You will have something that resembles a cross shape now.


Step 6.
You can visualise how this comes together now, so begin sewing the sides together so you have all 4 sides joined. The Jumbo Clover Wonder Clips really work a treat for this part. Before you tackle sewing a side, you can carefully cut into the join of the fabric so it eases out the very corner (as shown in final photo).


Step 7.
At this point you can make your box look neater on the interior side by sewing 2" wide binding strips to the sides. I added it to the 4 vertical seams, but you can choose to omit this step or be cover even more of the raw seams.


Step 8. 
Work out how much binding length you need to finish the top edge of the box. Cut 2" wide strips and sew together in one continuous strip. Use Wonder Clips to position the binding strip right sides together to the exterior side of the box.


Step 9.
Leave a good length of binding tail loose before your starting point, about 7", sew around the edge carefully. This step can be quite tough depending on the box size, but the clips help and so does moving your sewing machine right off the edge of your table, I found you can hook the box round the machine so there is a little less wrangling!


Once you are about that same distance away from the start, stop sewing.


Find where the binding pieces meet, finger press. Pin and sew along the pressed line. Trim off the excess binding and finish sewing the binding to the box.


Step 10.
Fold the binding raw edge inside, and then fold down neatly to the interior side of the box. Use Wonder Clips to hold in place and glue down the edge to finish. Leave to dry with clips in place.


Measure Your Own Box
Work out the finished width, depth and height of the box you want to make.


Use the below as a guide for how big to cut your fabric pieces.

Box Height x 2 + Box Diameter - 1/2" = ?
x
width + 1/2" = ?
= Fabric Piece A

My example; 8x2=16 + 9.5-0.5=25
x
13.5+0.5=14
= 25 x 14 Fabric Piece A

Box Depth + 1" = ?
x
Box Height
= Fabric Piece B

My example; 9.5+1=10.5
x
8
= 10.5 x 8 Fabric Piece B

For the stabiliser pieces.
Piece A = Box Depth - 0.5 x Box Width - 0.5
Piece B = Box Depth x Box Height - 0.5


I'm up to 9 boxes so far, in 3 different sizes! Be sure to tag me (@messyjesse1 or the shop account @sewandquilt) on Instagram if you make some yourself, I would love to see your organised sewing spaces! Mine is well underway now ;-) I'll share some snaps once I'm finished.

Thursday, 1 August 2013

Quilt Design Board DIY

Putting up a quilt design wall has been on my list of things to do ever since I had my overhaul in the sewing room a few months back, somehow I never got round to getting it done? I've also been getting tired of tip-toeing around quilt blocks I had arranged carefully on the floor! So enough was enough!!
Last Saturday I got my butt in gear (with the help of Robin) we made a quick trip to B&Q and picked up two sheets of hardboard, some gaffa tape and a roll of 'No More Nails' double sided tape. I already have a roll of 100% cotton batting that I use for my quilt-making so I just cut it to size plus a couple of inches bigger, ironed it and then laid it flat on the floor with the hardboard on top and gaffa taped it in place all the way around the edges. We then used a few rows of double sided tape on the back of each board and stuck them to the wall side by side! voila, done! 
It's not the best budget busting DIY, roughly £20 + the cost of the wadding but it worth it's weight in gold getting things off the floor! The hardboard works really well to make it a nice hard flat surface that you can stick your quilt blocks to and re-arrange for colour placement etc. I've seen some people hang batting up with a curtain pole, so there's lots of other ways to do it - but I wanted a firm surface. I'm amazed at how well things stick to it! It's such a great way of brightening up my sewing room, while being practical :) I love just gazing at my WIP now. Above are the farmers wife blocks I've completed so far - not many!! and some *very wonky* stars I did ages ago. I think the design board will be a good way to motivate me to complete some projects! :) 
Jessie, xo 

Thursday, 27 June 2013

Crafty Corner

So you may remember I had a bit of a spruce up in the sewing room a while back, I managed to clear out a whole Ikea expedit unit because I just didn't have the room in my tiny space and it was beginning to look like an episode of Hoarders! eek! Time for a de-clutter...
And this is the finished result ! I completely love it. I scored the antique carver chair (and 5 others, now used in my dining room) for £20 on Ebay!! I found them locally so it was a really great deal :) I got the pink shelves from my local auction house last month, it was originally pine but I thought the candy pink would be a great colour for the sewing room and break up the dark wood. It holds all my 'cute' things that I like to keep out on display and my sewing patterns (modern only, I keep my vintage ones in another part of the room - see more on that here).Once I use them I like to store them in clear zip-lock bags to keep all the tissue patterns safe! To the right I've finally hung my doll quilt I made last year! I'm so pleased to have it out on display now.
To the left of the chair you can see my antique wooden sewing box, which I adore! It has a lift-up lid and removable wood insert tray to hold smaller items, I use that to hold my current epp project with thread, small scissors etc so I can transport it downstairs when I need to. You can also spy another new vintage sewing box! The wicker one with a green lid. I have a sickness, I really do... 
I also found a nice spot for most of my sewing and craft reference books. It makes for a nice little cosy reading corner :) now I think I just need a pillow for the chair, a table topper for the sewing box and some more mini quilts for the wall and it's about complete! Lot's to be getting on with again! Have a great weekend folks, xo

Tuesday, 21 May 2013

Craft/Sewing Room Update

I'm really excited to share with you guys my updated craft/sewing room today! as you may have read already, I had quite a clean out in here a couple of weekends ago; there was mess and then chaos and then more mess and then thankfully it came together rather nicely, if I do say so myself!
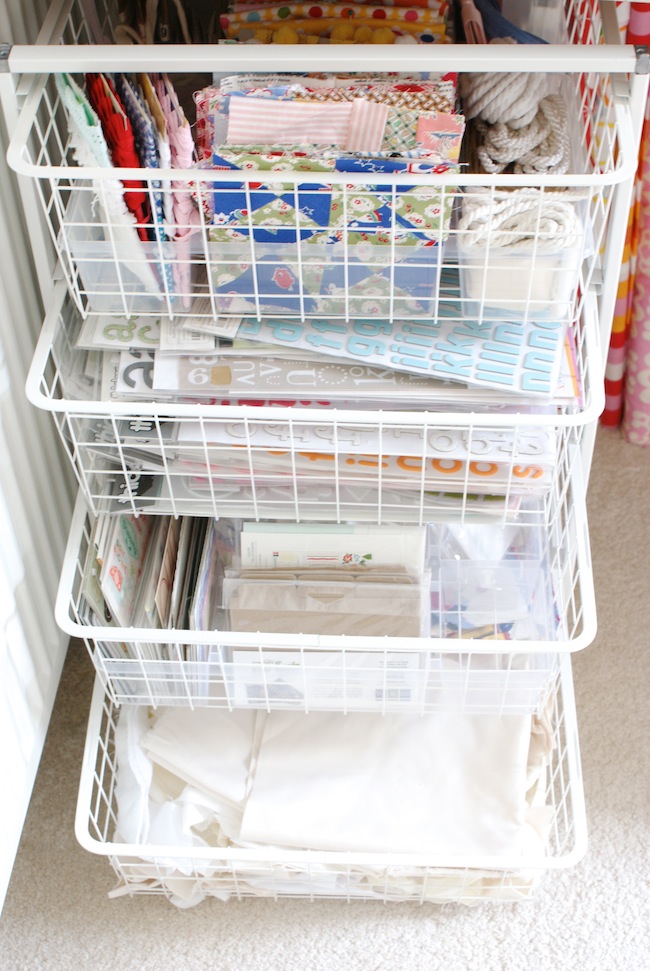
So I decided to replace my Ikea trestle desk legs in favour of the Antonius drawer units. They're made of steel so I figured they would be a great support for my desk top, and heavy machine. I've been using it for about a week now and I'm so glad I got them! Not only are they full of storage space, they are slightly lower which makes sewing much easier!! I got one unit with four wire baskets to hold my paper-crafting things and some of my sewing bits and bobs and my neutral solid scraps that I always use. 
For the other unit I purchased the Antonius frame only, and four of the small matching drawers. In here I hold all of my scraps by colour; pinks/purple, red, blue/green, yellow/white/brown/grey. 
ahh I just love it, the layout of £48 for both has been completely worth it just to have all my scraps nicely organised! It's made tidying up after a project a breeze now.
These Antonius basket inserts are great for organising little things. I found that you can fit two of these inserts per basket, (not the Antonius drawers though) and because they're clear you can see exactly what's in them. 
At only £1.70 each I thought they were a great buy so I bought a bunch of them to store on my regular shelves too! This one holds all my hexies! 

Above my desk I now have a rail system in place to hold all my sewing necessity items like rotary cutters and scissors close by. These are the Ikea Fintorp rails with matching buckets and hooks. I love having my craft things out on display and easy to grab - there's nothing worse than digging through boxes and baskets finding a stitch ripper is there? so this works great for me. 
On the left wall as you come into the room I have two Ikea Bekvam spice racks, which I painted white to blend into the wall. These display my vintage sewing patterns, and jars for buttons, pins and hair grips I use for binding. I also got handy with the hammer and put in a couple of nails on the side of my big shelving unit to keep my rulers in place, they have never seemed to have a good place to be put away before, so this has made me really happy! Did I mention that I love wall storage!? ;) 


On the other side of the room, I have culled alot of my stuff and cleared out a whole Expedit unit!  I was beginning to feel quite cramped in here and I really needed more floor space when laying out quilts etc so it was time for a change. It was mainly books I stored, so Robin built us some shelves in our living room to house them, free'ing up a lot of much needed space! I now just have this old ikea ladder shelf, to store some books, sewing patterns etc as well as my paper storage unit. 
    I'm planning to change this area just as soon as I find myself a nice high-backed rocking chair (just missed out on one on ebay, deep breaths...) to fit nicely in the corner. I think it would be a great little snug place to do some english paper piecing, next to my fire :) I also want to hang a design wall up at some point as I have a lot of wall space now. 

So there you have it, my new and improved sewing space! I hope you enjoyed it, and perhaps picked up some organising ideas of your own :)

p.s. some really sweet new fabric's arrived at the Sew and Quilt shop yesterday, I hope you can take a look! xo

Thursday, 9 May 2013

A Work In Progress ...

So it started with this ...
A very messy and overflowing scrap box, which was completely impractical! With every project I would have to rummage through this banana box in search of a particular colour or fabric print I needed. Most of the time it would be all over the floor, and even more annoyingly; screwed up! So a while back I decided something had to be done about it; an IKEA online shop was needed. A month later (grrhh slow ikea) two antonius units arrived, amongst other things ;) to house my ever-growing scrap collection. 
So the morning after, this is where I'm at right now - it's definitely a work in progress! I've decided to re-arrange things completely in here as it was just getting out of control. I didn't have enough storage units so I was just piling things very precariously on top of one another. You all remember when I first did my sewing room yeh? Well, the IKEA trestle legs have gone, in place of the new antonius units and I will hopefully be plotting some other things in here this weekend too. I'm so excited!! Seriously, I love organising, and even more when it's fabric and craft stuff! 

I hope you all have as much fun as me this weekend! :) See you next week friends, xo

Monday, 12 March 2012

Craft Room Idea: Wall Storage

Hello friends! I had an idea recently to utilise some of the wall space above my desk, so this is what I came up with! I used to keep my tools and pens in a couple of pots on the desk but I've found recently I'm needing more and more space for cutting so this seemed like a logical idea for me. 
I used acrylic bathroom containers from Muji, you can find them here, adhesive velcro and 'No More Nails' or any strong glue. To make: cut two strips of velcro per container. Next, lay the opposite sides of the velcro to stick to the container and add a couple dots of strong glue, fix in position on your wall and your done! See, I told you it was simple :) I plan to share more crafty storage tips with you soon, so be sure to check back. Hope you all had a fun weekend. Jessie, xo

Tuesday, 13 December 2011

Our First Home: Craft room update

Well here it is, this is my new sewing room / studio for messy jesse. It's the perfect craft space, with lots of shelving and storage for my growing fabric collection. A new addition to this room is a wall-mounted TV over my desk yippee! 
Wowee such a difference hey, It's so amazing what a lick of white paint can do! I haven't got my new scalloped blind or a light fitting in yet so it's not quite there but I couldn't resist giving you an update. I was lucky enough to already have the wall shelves there when we moved in so all they needed was a rough sanding and some fresh paint. The thread rack is handmade by a seller I found on Ebay. I also found a cute little place to hang my bunting :)


Note the victorian fireplace I painstakinly restored for DAYS! I haven't got a proper picture of it before I started on it annoyinly, but it was covered in a ultra thick layer of cream paint which I stripped down using nitro mors solution and a little metal scraper, hopefully won't have to do that again : I My trustee expedit holds my sewing books and my prized collection of Golden Hands encyclopedia's (mentioned in a previous post here). As well as lots of papercrafting bits and bobs. The ladder shelves house an array of sewing notions, threads, trims and paper patterns. I'm still working on this part, I'd quite like to have more of these things on show but I'm not sure how to work this yet.


I've got a new desk by upcycling the old kitchen countertops we ripped out downstairs. It's so sturdy, and a great neutral colour for the room. My old desk from IKEA bowed with the weight of my sewing machine so hoping this won't do the same?


 And the crowning glory... the fabric collection! I've arranged it with vintage sheets, curtains and pillowcases on the bottom four shelves and modern fabric on the two shelves above that, then fat quarters all arranged my colour, topped off with some larger yardage peices including some beautiful linen I brought back from Turkey on a holiday this year (going to be turned into a couple of sofa cushions). Some CK fabric, and a stack of vintage emroidery bits and bobs I've been collecting from charity shops this year. 


Haha my scrap bucket! what a disaster it looks but it actually works quite well for me. I need my scraps relatively easy to get to and not too tidy where it takes me forever to tidy. Do you have any good scrap organising tips? though I'm hoping to clear alot of it in the new year with some scrap-busting projects. A shelf of my vintage sewing baskets and tins store less-frequently-used items, like press studs, zips, alphabet stickers, and button poppers. Hmm have I missed anything out, let's see: deer ornament collection over the mantelpeice, vintage Singer sewing machine and spools of bakers twine = my perfect studio.